How to Install Wrap N’ Snap Column Wrap Trim Kit
Column Wrap Installation Steps
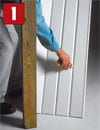 STEP 1
Handle Column Wrap with care to prevent the joint tape from tearing. Cut Column Wrap to proper height. Apply a bonding adhesive inside each groove. A 1/8″ bead along the total length is recommended in the mitered corners. A 1/16′ bead is recommended in the snap lock: note that an excessive amount of adhesive in the snap lock may result in a sink line in the outside surface. For optimum results, use and adhesive with moderate setup time. Recommendations for bonding adhesive: Cellular PVC adhesives perform well. Bond and Fill and Christy’s are typical brand names. Ask your dealer for Wrap N’ Snap PVC adhesive, part number WNSA8, available in 8 oz. tubes.
STEP 1
Handle Column Wrap with care to prevent the joint tape from tearing. Cut Column Wrap to proper height. Apply a bonding adhesive inside each groove. A 1/8″ bead along the total length is recommended in the mitered corners. A 1/16′ bead is recommended in the snap lock: note that an excessive amount of adhesive in the snap lock may result in a sink line in the outside surface. For optimum results, use and adhesive with moderate setup time. Recommendations for bonding adhesive: Cellular PVC adhesives perform well. Bond and Fill and Christy’s are typical brand names. Ask your dealer for Wrap N’ Snap PVC adhesive, part number WNSA8, available in 8 oz. tubes.
 STEP 2
Wrap Column Wrap around the post and “snap” the outside edges together insuring a tight closure along the entire joint.
STEP 2
Wrap Column Wrap around the post and “snap” the outside edges together insuring a tight closure along the entire joint.
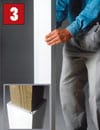 STEP 3
Once the bonding adhesive has set-up – typically a 24-hour period – remove the temporary joint tape and your column is complete. If the temporary tape is not removed after the recommended set-up time, it may be difficult to remove and a residue of adhesive may be left on the Column Wrap surface. Cleaners such as “Goo-Gone” may be used to remove the adhesive residue. Tape removal when ambient temperatures are less than 50 degrees F may be facilitated with heat from a heat gun applied to the tape during removal.
STEP 3
Once the bonding adhesive has set-up – typically a 24-hour period – remove the temporary joint tape and your column is complete. If the temporary tape is not removed after the recommended set-up time, it may be difficult to remove and a residue of adhesive may be left on the Column Wrap surface. Cleaners such as “Goo-Gone” may be used to remove the adhesive residue. Tape removal when ambient temperatures are less than 50 degrees F may be facilitated with heat from a heat gun applied to the tape during removal.
Painting Column Wrap
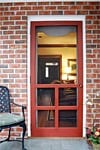 Wrap N’ Snap Column Wrap does not require painting to retain its color or remain impervious to moisture. However, it can be painted to match existing colors or to achieve a desired look with excellent results. Column Wrap will outperform wood in paint adhesion and longevity.
Use a 100% acrylic latex paint or 100% acrylic latex paint with a urethane additive to achieve superior durability and flexibility. For better performance use light colors with a light reflective value of 55 units or greater. Dark colors will have an impact on the expansion and contraction of the material.
To ensure good adhesion, Column Wrap should be clean, dry, free of dirt, loose peeling paint, mildew, chalk, grease, and other surface contaminants before painting. Cleaning can be done with a cloth and a mixture of water and mild detergent, preferably a household cleaner or plain alcohol.
Wrap N’ Snap Column Wrap does not require painting to retain its color or remain impervious to moisture. However, it can be painted to match existing colors or to achieve a desired look with excellent results. Column Wrap will outperform wood in paint adhesion and longevity.
Use a 100% acrylic latex paint or 100% acrylic latex paint with a urethane additive to achieve superior durability and flexibility. For better performance use light colors with a light reflective value of 55 units or greater. Dark colors will have an impact on the expansion and contraction of the material.
To ensure good adhesion, Column Wrap should be clean, dry, free of dirt, loose peeling paint, mildew, chalk, grease, and other surface contaminants before painting. Cleaning can be done with a cloth and a mixture of water and mild detergent, preferably a household cleaner or plain alcohol.
Because Column Wrap finishes very much like wood, prepping will be similar to that of wood. Fill any nail holes with a recommended caulk, and clean or sand any marks or blemishes left from handling and installation. Once sanded however, the original surface will be slightly textured.
Paint can be applied with rollers, brushes or sprayed. Follow common sense practices used to paint wood outdoors.
Even though Column Wrap may feel dry to the touch a few hours after painted, please note that Column Wrap does not absorb paint like wood and the paint may not be fully cured. Some paints will not obtain full adhesion for 2 to 3 weeks on PVC products.
Sanding the surface of Column Wrap can be used to increase adhesion. However, this step should not be needed with most quality paints.
Wrap N' Snap Column Wrap Trim Kits Installation Steps
 STEP 1
All Royal Wood Wrap N’ Snap moldings are pre mitered with slots cut for dovetail connectors. The dovetail connectors slide easily into the pre-cut slots and securely hold the corners together.
STEP 1
All Royal Wood Wrap N’ Snap moldings are pre mitered with slots cut for dovetail connectors. The dovetail connectors slide easily into the pre-cut slots and securely hold the corners together.
 STEP 2
To install the molding around the column, join the four corners using a dovetail at each corner with a small amount of PVC adhesive. Attach the molding in the desired location on the column.
STEP 2
To install the molding around the column, join the four corners using a dovetail at each corner with a small amount of PVC adhesive. Attach the molding in the desired location on the column.
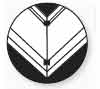
 STEP 3
The Wrap N’ Snap moldings are available in the Base Molding, the Bead Molding and the Crown Moldiing. The Bead Molding, XL is long enough to fit around the Wrap N’ Snap Base / Cap.1.
STEP 3
The Wrap N’ Snap moldings are available in the Base Molding, the Bead Molding and the Crown Moldiing. The Bead Molding, XL is long enough to fit around the Wrap N’ Snap Base / Cap.1.