Screened Sanctuary: Enhance your existing deck’s privacy and protection
By: Mike Berger. Each year blazing sun, sudden rains and swarms of insects conspire to keep us from enjoying our decks as much as we’d like. Wouldn’t it be nice to have outside living space that not only protected you from insects and weather but also added beauty and value to your house? You can achieve all of this by building a screened enclosure over your existing deck.
Although it’s impossible to design an screen enclosure that fits every deck or need, you can easily modify our structure to fit almost anywhere, thanks to its few components and simple construction techniques. If you have a basic understanding of carpentry, in just a few weekends you’ll be able to build your own version of our screened-in sanctuary.
Designing the structure
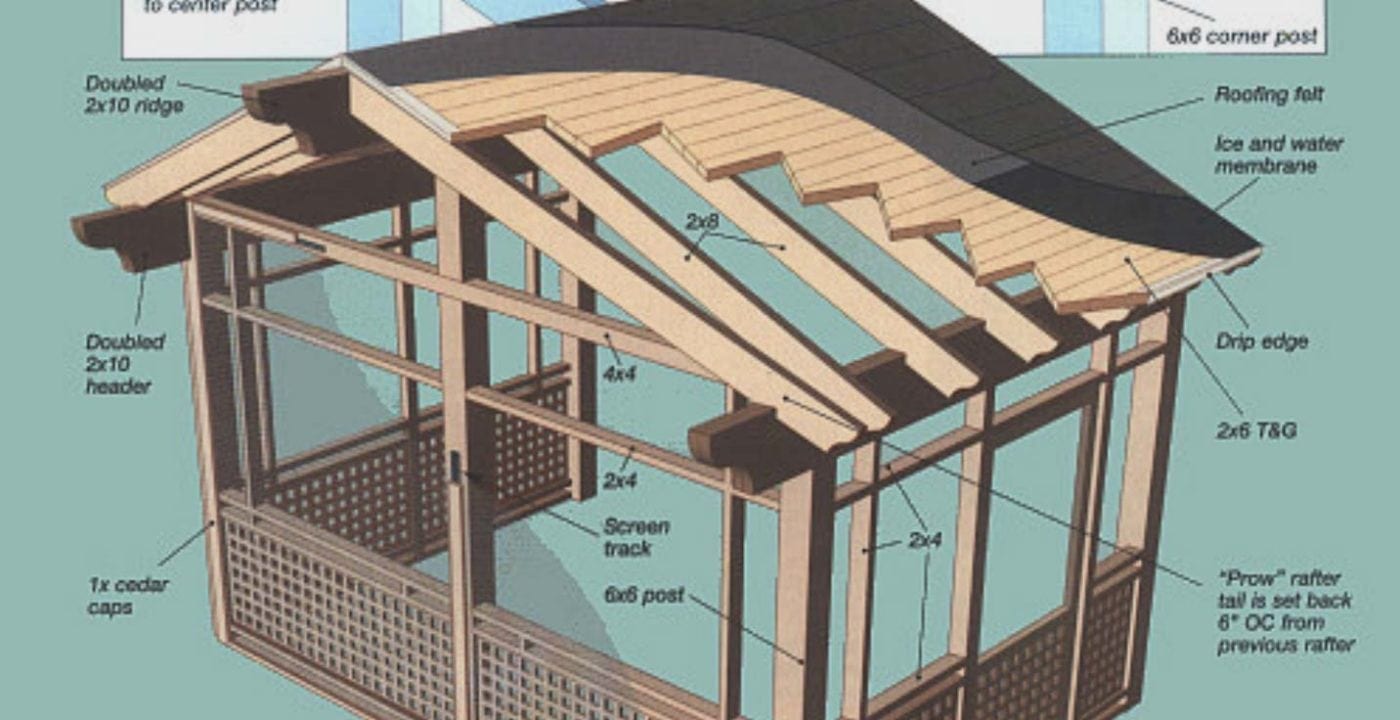
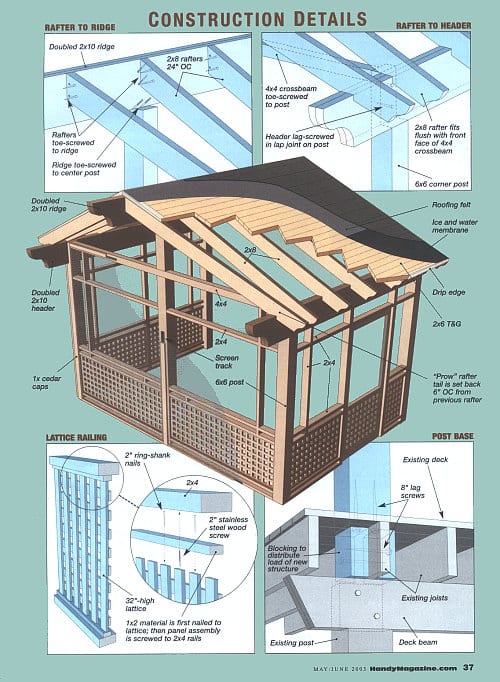
Though building a screened enclosure may seem daunting at first, take heart; surprisingly few structural elements are necessary to this design. Five 6×6 posts provide the primary support. Two headers run the length of each side — in our case, the headers are doubled 2×10 full-size cedar beams. (Full-size lumber differs from dimensional lumber in that its actual dimensions match its stated size, whereas a dimensional 2×10 measures only 1-1/2 x 9-1/2 in.) A ridge beam runs down the center of the roof and forms the prow of the roofline — again we used doubled 2×10 full-size cedar. Rafters made of 2×8 full-size lumber support the roof sheathing of 2×6 tongue-and-groove cedar, and asphalt shingles keep the elements off your head.
It’s up to you whether to add railings, lattice, doors or trim, depending on your structure. For example, if you’re building on top of a ground-level deck, you might be able to omit a railing altogether. If you’re building on an elevated deck with no access to the ground, skip the door.
Of course, local codes will govern some aspects of the design. You must file a final plan with your municipality before construction, and you must obtain a building permit. Local officials will closely analyze such factors as the amount of weight the roof may need to support (say, because of snow loads), the number of footings needed to handle that weight, and how the load is transferred to those footings. If you’re not sure that your existing deck will work, ask for a preconstruction site inspection. It’s better to have experts discover a potential problem before construction than to have to remedy it afterward.
Building the framework
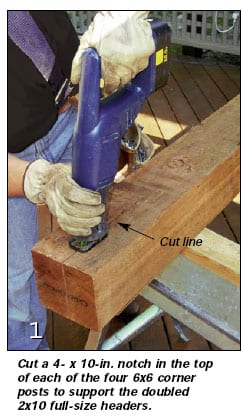
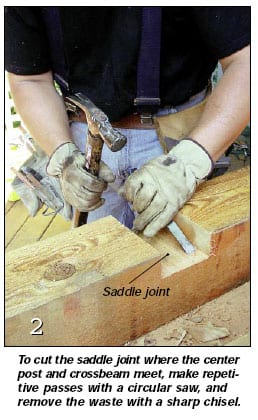
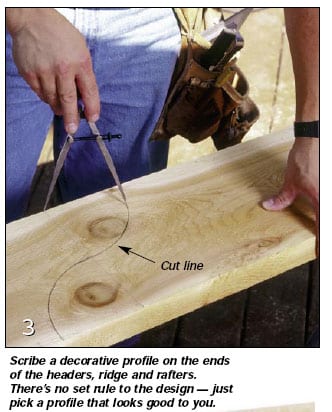
To begin construction, cut the notches in the 6×6 corner posts that will support the headers (photo 1), and cut the saddle joint where the 6×6 center post and the 4×4 crossbeam will meet (see drawing, opposite, and photo 2). Also cut the curved profile of the headers, ridge and rafter tails. Choose a radius that is pleasing to the eye, scribe it with a compass and make the cut with a jigsaw (photo 3). Then cut notches (called bird’smouths) in the rafters where they’ll sit atop the headers. Mark the locations for the 6×6 posts on the existing deck, hold them in place and have a helper drive in lag screws to fasten them to the deck (photo 4). If you need to add bracing to transfer the load (as dictated by your local building inspector), install it after you’ve driven the lag screws — otherwise it may restrict access to the undersides of the post locations (see drawing). To further secure the two posts that abut the house, drive 3/8-in.-dia. x 10-in. lag screws through the posts and into the walls.
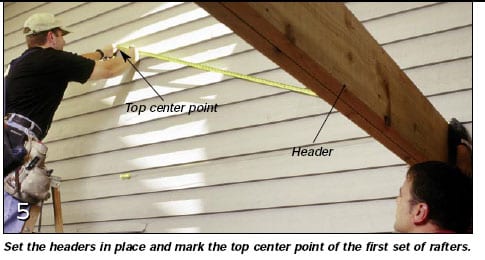
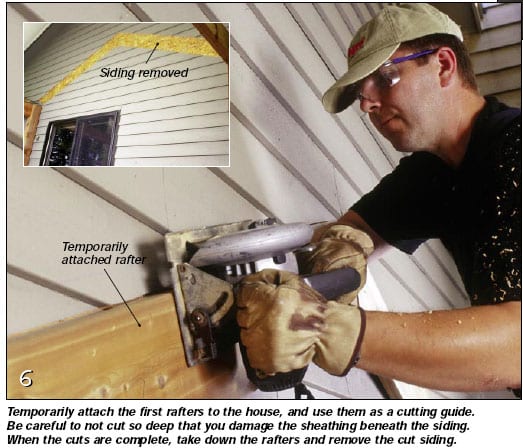
Once the 6×6 posts are secure, lift the headers into place and screw them to the posts. Then measure for the placement of the first set of rafters (the ones that will rest against the house) by marking the top center point (photo 5). Temporarily screw the rafters to the house wall, and use them as a guide to cut away the siding with a circular saw (photo 6). Set the saw blade just deep enough to cut through the siding, but not the sheathing. Once you’ve completed the cut, take down the rafters and remove the cut siding pieces.
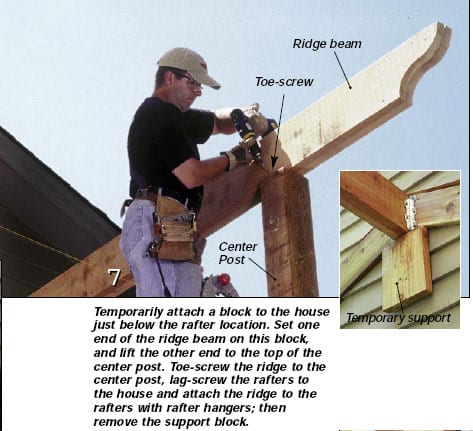
Temporarily attach to the house wall a block of wood to serve as a support, just below the pinnacle of the removed band of siding. Rest the square end of the ridge beam on top of the block, lift the other end of the beam to the top of the center post and toe-screw it in place (photo 7).
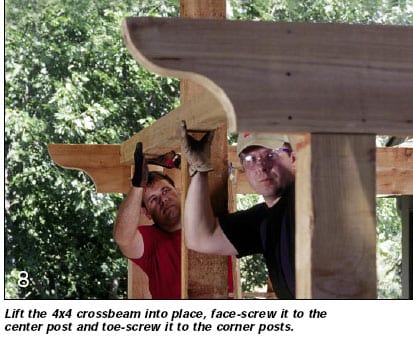
Set the first pair of rafters into the channels where the siding was removed — the bird’s-mouth will rest on the header; the other end sits flush against the face of the ridge beam. Drive 4-in. lag screws through the rafter faces and into the sheathing, install rafter hangers to attach the ridge beam to the rafters and then remove the support block. Lift the 4×4 crossbeam into the saddle joint you previously cut. Face-screw the beam to the center post, and toe-screw it to each of the front corner posts (photo 8). Make sure the beam is level and that you’re not pulling the corner posts out of plumb.
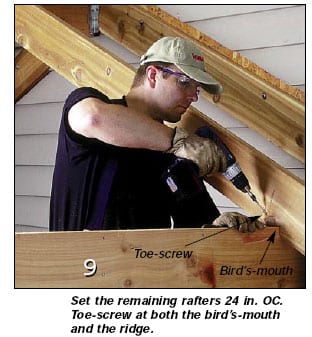
Now that the beams are secure, set the remaining rafters 24 in. OC (photo 9). Because the last rafter cants outward, you’ll need to miter the rafter ends where they meet the ridge and make adjustments for the angle to the bird’s-mouths.
Adding roofing
Building a roof for a screened enclosure is a bit different from building one for a garden shed or an other outdoor structure where you don’t really care what the underside looks like. Because this project’s sheathing is visible from below, the roof is as decorative as it is functional. To heighten the rustic look, we opted for 2×6 cedar tongue-and-groove (T&G) boards. Besides providing visual warmth, the 1-1/2-in. thickness of the boards prevents the roofing nails used to fasten the shingles from completely penetrating the sheathing.
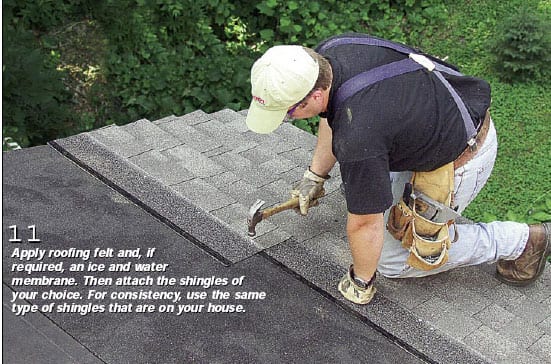
Nail the T&G boards to the rafters (photo 10) and apply roofing felt on top (photo 11). If local code dictates, add an ice and water membrane. Attach drip edges to the perimeters of the roof, step flashing where the new roof meets the side of the house, and shingles. Tuck the upper edge of the flashing sections beneath the cut edges of the siding.
Building the railings
Our railings needed to match an existing deck, but yours could be as simple or as complex as you like. To duplicate ours, start with 4×8 sheets of cedar lattice, cut in half to create 2-ft.-wide panels. Nail lengths of cedar 1x2s to the top and bottom of the lattice panels using stainless steel ring-shank nails placed every 12 in. Drill pilot holes, as the thin lattice has a tendency to split (see lattice railing detail on the drawing).
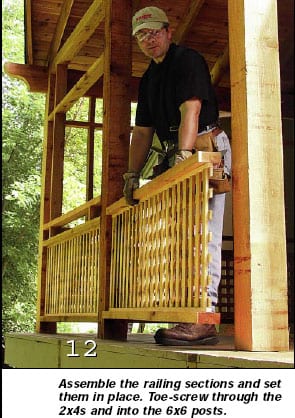
Toe-screw through the 1x2s into precut cedar 2x4s. Then lift the railing sections into place and toe-screw through the 2x4s into the corner and center posts (photo 12). The rest of the infield trim pieces are lengths of cedar 2x4s placed to convey an Arts and Crafts design. You could just as easily replace the pieces with manufactured gingerbread trim to suggest a Victorian or country look or omit them altogether for a contemporary appearance.
Staining the wood
Cedar is naturally rot-resistant, but if left untreated, its color will fade and it will deteriorate much more quickly. To retain the color of fresh cedar and extend the longevity of the enclosure, treat the lumber with a stain or clear preservative — we used Natural Choice transparent finish from Okon (see SOURCES) — before installing screening.
Choosing the Best Screen Mesh
To get the most from your new enclosure, you’ll need the right screening material. Fiberglass and aluminum are the most common types of screening. Both are available in a variety of mesh sizes – the larger the number, the smaller the weave – and in various colors (We used 20×20-mesh fiberglass). Fiberglass is the most worry-free of all screening material, as it will not rust, rot, or stain.
In some cases, additional considerations apply. For example, if you’ll share your enclosure with pets or young children, you may need a more durable screening. If you live near the ocean, fiberglass screening will resist the corrosive properties of salt air. And if your enclosure will be exposed to direct sunlight, you can reduce heat and glare by installing a shading fabric which may block eighty to ninety percent of the sun’s rays, yet still allow soft light to filter in.
When it came to the screening, the last thing we wanted was to mess with traditional screen frames, for two reasons. First, building frames is extra work. Although they allow you to remove the screens, that’s unnecessary for most enclosures. Second, we didn’t want to clutter the clean lines of the enclosure with additional frame components. In fact, we wanted the screening to virtually disappear.
To achieve both the appearance and functionality we desired, we chose Screen Tight’s porch screening system. Made of maintenance-free UV-resistant vinyl, Screen Tight uses a base track that screws to the face of the opening (see photo, top right, p. 42). Just as with manufactured screen windows, a rubber spline is then rolled into the base, securing the screening without nails, staples or screen molding. Bases come in 8-ft. lengths — easily cut with pruning shears — and are available in both 1-1/2- and 3-1/2-in. widths, perfect for both 2×4 and 4×4 applications.
Screen Tight also offers vinyl caps that snap over the bases. Though we opted to make our own from matching cedar, the caps (available in white, beige, gray or brown) easily snap on with a light mallet blow.
To install the bases, simply measure and cut them to length and then screw them to the outer faces of the posts and beams using 1-in. stainless steel screws. Drive a screw into each of the precut slots, and make sure there’s one within 2 in. of the end of each base strip. Drive the screws so they are snug but not so tight that they deform the vinyl track.
Installing the screen material is not difficult but initially can be a bit awkward. To start, hold the screening up to the top track, and with a spline roller (available at most hardware stores), press the rubber spline into the molded groove. Use a .175-in. rubber spline for fiberglass screen and .160-in. spline for aluminum screen. As you roll the spline, pay attention to the direction of the screen mesh, and keep the wires parallel with the track.
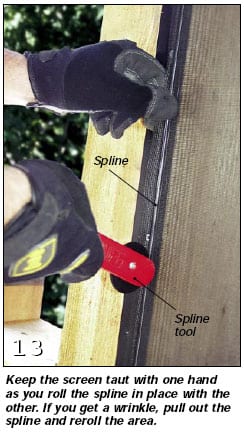
Once you’ve rolled the top spline, work your way down each side. Pull the screen taut with one hand as you roll the spline into the groove with the other (photo 13). If you accidentally create a wrinkle, just pull out the spline and reroll that area.
Roll the bottom edge last. If you’re using the vinyl caps, you don’t need to stretch the screening drum-tight; as you snap the caps in place, they’ll help to tighten it. If you construct cedar caps as we did, start with 1×4 strips cut to the same length as the vinyl bases. Cut a 3/8- x 1-7/8-in. rabbet running the length of each strip, and screw the caps over the bases using 1-1/2-in. stainless steel screws (photo 14).
Finishing the job
The last few steps, such as installing a door or adding lighting, can make or break the overall look of the enclosure. If you’ve gone to great lengths to create an ornate railing system (as with our enclosure), a generic prefabricated screen door might look out of place. Likewise, the wrong style of lighting can make an otherwise elegant addition seem cobbled together.
To unify the overall look of our enclosure, we built a custom screen door (see “Cedar Screen Door,” p. 12).We also could have installed a solid vinyl screen door such as those from Screen Tight. To heighten the Arts and Crafts look, we installed period-inspired lowvoltage lights from Progress Lighting and an Outdoor Elements ceiling fan in raw copper from Hunter Fan. Both fixtures add to the overall ambience and help bring an increased sense of light and warmth to an already inviting addition.
Sources
Hunter Fan Co. 800-448-6837,www.hunterfan.com
Okon Inc. 800-237-0565,www.okoninc.com
Phifer Wire Products Inc. 800-633-5955, www.phifer.com
Progress Lighting (864) 599-6000,www.progresslighting.com
Screen Tight 800-768-7325,www.screentight.com